There are two ways to deploy your custom composed look. Via XML / Elements file – the declarative way, or via feature receiver / C# the imperative way.
This article will cover both methods, it’s up to you to ultimately decide which way you prefer.
First I will explain how to put together the the Visual Studio 2012 project with the assets for the composed look. If you already know how to deploy these assets or they already exist in SharePoint skip down to the bottom.
The Project
Starting with an empty SharePoint Project – farm solution.
First we need to add 4 things which are used by the Composed Look.
- Master Page
- Theme (Colors)
- Font Scheme (Optional)
- Background Image (Optional)
Adding the Master Page
In the Visual Studio Project, right click the solution, select Add, select New Item
Select Module –> Name: MasterPage
In the MasterPage module, Delete the sample.txt
Copy in your masterpage
Edit the elements file, make it look like this.
This completes this section.
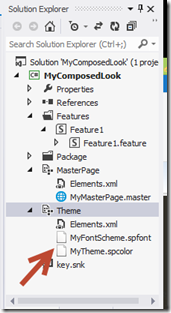
Adding the Theme
In the Visual Studio Project, right click the solution, select Add, select New Item
Select Module –> Name: Theme
In the Theme module, Delete the sample.txt
Copy in your {theme}.spcolor
Edit the elements file, make it look like this.
This completes this section.
Adding the Font Scheme
In the Theme module, add in your {fontScheme}.spfont
Edit the elements file, make it look like this
<File Path=”Theme\MyFontScheme.spfont” Url=”MyFontScheme.spfont”
Type=”GhostableInLibrary” IgnoreIfAlreadyExists=”TRUE” />
This completes this section.
Adding the Background Image
In the Visual Studio Project, right click the solution, select Add, select New Item
Select, SharePoint “Images” Mapped Folder [Alternatively you can deploy this to the layouts]
Add your background image to that folder
This completes this section.
Adding a Composed Look – the Declarative Method
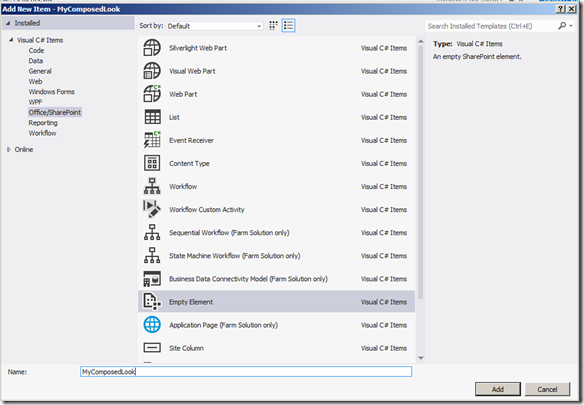
In the Visual Studio Project, right click the solution, select Add, select New Item
Select Empty Element –> Name: MyComposedLook
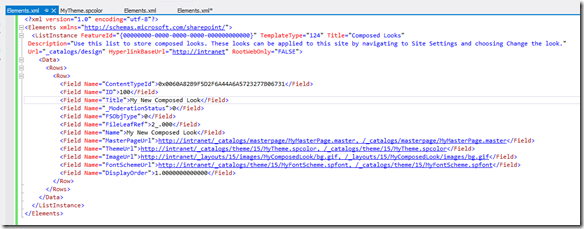
Edit the elements file
Make sure to match up the MasterPageUrl, ThemeUrl, ImageUrl, FontSchemeUrl.
|
          0x0060A82B9F5D2F6A44A6A5723277B06731
          100
          My New Composed Look
          0
          0
          2_.000
          My New Composed Look
          http://intranet/_catalogs/masterpage/MyMasterPage.master, /_catalogs/masterpage/MyMasterPage.master
          http://intranet/_catalogs/theme/15/MyTheme.spcolor, /_catalogs/theme/15/MyTheme.spcolor
          http://intranet/_layouts/15/images/MyComposedLook/bg.gif, /_layouts/15/MyComposedLook/images/bg.gif
          http://intranet/_catalogs/theme/15/MyFontScheme.spfont, /_catalogs/theme/15/MyFontScheme.spfont
          1.0000000000000
This completes this section.
Adding a Composed Look – the Imperative Method
In the Visual Studio Project, right click the feature, select Add Event Receiver
Inside the FeatureActivated add the following
**This is experimental code, make sure to do your own testing if using**
     const string CustomLookName = "MyComposedLook";
        const string MasterPageUrl = "_catalogs/masterpage/MyMasterPage.master";
        const string ThemeUrl = "_catalogs/theme/15/MyTheme.spcolor";
        const string FontSchemeUrl = "_catalogs/theme/15/MyFontScheme.spfont";
        const string ImageUrl = "_layouts/15/images/MyComposedLook/bg.gif";

            var site = properties.Feature.Parent as SPSite;

            if (site != null)
            {
                var serverRelativeUrl = site.RootWeb.ServerRelativeUrl;
                SPList list = site.RootWeb.Lists["Composed Looks"];

                bool match = false;
                foreach (SPListItem listItem in list.Items)
                {
                    if (listItem.Name == CustomLookName)
                    {
                        match = true;
                    }
                }

                if (!match)
                {
                    SPListItem item = list.AddItem();

                    item["Title"] = CustomLookName;
                    item["Name"] = CustomLookName;

                    SPFieldUrlValue masterUrl = new SPFieldUrlValue();
                    masterUrl.Url = serverRelativeUrl + MasterPageUrl;
                    masterUrl.Description = serverRelativeUrl + MasterPageUrl;
                    item["MasterPageUrl"] = masterUrl;

                    SPFieldUrlValue themeUrl = new SPFieldUrlValue();
                    themeUrl.Url = serverRelativeUrl + ThemeUrl;
                    themeUrl.Description = serverRelativeUrl + ThemeUrl;
                    item["ThemeUrl"] = themeUrl;

                    SPFieldUrlValue imageUrl = new SPFieldUrlValue();
                    imageUrl.Url = "";
                    imageUrl.Description = "";
                    item["ImageUrl"] = imageUrl;

                    SPFieldUrlValue fontSchemeUrl = new SPFieldUrlValue();
                    fontSchemeUrl.Url = "";
                    fontSchemeUrl.Description = "";
                    item["FontSchemeUrl"] = fontSchemeUrl;

                    item["DisplayOrder"] = 100;
                    item.Update();
                }

                site.RootWeb.ApplyTheme(serverRelativeUrl + ThemeUrl,
                                          null, null, true);
            }
Adding the Modules/Elements to the Feature
Double click on your feature, and ensure that the MasterPage & Theme are included in the feature.
If your using the declarative method for the Composed Look then make sure the MyComposedLook Element is in the feature.
If your using the imperative method then your feature receiver will do the work when activated.
Make sure that the Scope is set to Site
This completes this section.
Deploy and enjoy


Hi,
Shall I deploy the same to the sharepoint online(O365)
you can use the declarative method for online
[…] have a requirement to create compseod look via VS. We have followed this article. Here are the steps mentioned in the […]
Reallu a great post. I was struggling with the creation of a Composed look declarative.
Your “Adding a Composed Look – the Declarative Method” section was very handy.
Cool article. I have noticed few points:-
1. You scope the composed look to site (site collection) level. So, Is it possible to apply this composed look to all sub-sites?
2. I had updated the master page code to hide the suitelinksbar. When this project is deployed, I notice that the masterpage, .spcolor gets added to the respective folders. Also the new colors get applied to the site. However, the suitelinks bar is not hidden. Then, I went to designer –> masterpage and set the new masterpage as default. Now the suitelinksbar is hidden. My question is, in case we use composed looks in SharePoint 2013, then, we are already specifying the masterpage URL in the feature activated event receiver, and then programatically applying the theme. Is it then necessary to also write the code to set the new masterpage as default in the activated part of feature event receiver?
Thank you for your comments.
1. Yes you can apply to all sub-sites using feature receiver code. One way to do this would be to get the root web url and on the subsite point it back to that location. Below is pseudo code (I haven’t checked it). I used something like this but this is not exact.
var rootWebUrl = web.Site.RootWeb.ServerRelativeUrl;
web.ApplyTheme(rootWebUrl + colorPaletteUrl, rootWebUrl + fontSchemeUrl, rootWebUrl + BackgroundImageUrl, false)
2. You can update the composed look xml to use your developed masterpage. One thing to note is if you want to be able to select your composed look through the ui then you need to also have a .preview for your masterpage. I would just copy the seattle.preview and rename it, unless you want to make your own special one.
If using declarative mode you can use tokens like this:
~Site/_catalogs/masterpage/TGF.Teams.master, /_catalogs/masterpage/TGF.Teams.master
~SiteCollection/_catalogs/theme/15/TGF.Teams.spcolor, /_catalogs/theme/15/TGF.Teams.spcolor
~SiteCollection/_catalogs/theme/15/TGF.Teams.spfont, /_catalogs/theme/15/TGF.Teams.spfont
Hi,
I follow the above method and after deploying I navigate to the master page gallery. It gave me the error: “file not found”. Besides that, the master page is not visible in designer. Any help?
If the file is not there then potentially the module used to deploy it is not 100% accurate, or the path / url may be invalid or wrong.
If it’s just not showing up in Designer when you hit masterpage, then the property in the module defining the content type is not right. I you navigate to _catalogs/masterpage in designer do you see it? If so then update the properties of the item to be a ‘master page’
Going to that location vs Master Pages on the left navigation is totally different because it’s filtering on properties of the files.
nice tuto, thx
[…] deploy a Composed Look for SharePoint 2013. If you haven’t read that it can be found here – http://tommdaly.wordpress.com/2012/12/19/deploying-a-custom-composed-look-in-sharepoint-2013/. In that article I described the two methods declarative and imperative. Given all the recent buzz […]
Thanks for your guide. However I do have one question. To set the look-and-feel I could use this code in the event receiver.
site.RootWeb.ApplyTheme(serverRelativeUrl + ThemeUrl, null, null, true);
But how do I specify one master page as the system master page (i.e. seattle.master) and another one as a site master page (i.e. mycustom.master). I do not want the site master page to be used on for instance site settings and pages like that. I would like to set this programmatically and not through the GUI.
this is line sets the Theme in a 2010 site.
what you want it to set the masterpage then use something like this below
System Master
web.MasterUrl = masterUrl;
Site Master
web.CustomMasterUrl = masterUrl;
make sure to do
web.Update() once your finished
Thank you. I think the problem was that I forgot the web.Update() in my event receiver as you mentioned… I am using the following powershell snippet to solve this now.
—- PS Snippet —————————–
$web = Get-SPWeb https://thesite/
$web.MasterUrl = “/_catalogs/masterpage/seattle.master”
$web.CustomMasterUrl = “/_catalogs/masterpage/CustomMaster.master”
$web.Update()
————————————————-
Still having one problem though. The masterpage only applies to pages within the page library and not the one’s in site pages. This might be “by design” but is it possible to apply masterpage to those pages as well?
Thanks
Pages in the “Pages” folder are publishing and will use the site master page
The system master page is used for all web part pages, forms, list views, wikis, admin pages. Anything contained in “Site Pages” are web part pages.
so to get full coverage you would have to apply it to both.
Here is good link to clarify – http://blogs.technet.com/b/stefan_gossner/archive/2011/04/13/site-master-page-vs-system-master-page.aspx
Thank you for following up. Perhaps in the future it will be possible to set this up master pages with a higher granularity in a composed-look. As for now I will have to create a master-page that works both for the custom-looks-pages as well as settings, dialog and list pages etc..
does the Declarative Method set the composed look when create a new sub site from a solution.
Similar to site.RootWeb.ApplyTheme
nothing sets the composed look automatically on a sub site unless it’s a publishing sub site. There is a way to do it using an web provisioned event receiver.
[…] http://tommdaly.wordpress.com/2012/12/19/deploying-a-custom-composed-look-in-sharepoint-2013/ http://kilianvalkhof.com/2010/css-xhtml/how-to-use-rgba-in-ie/ http://www.estruyf.be/blog/how-to-create-a-master-page-that-is-available-for-the-composed-looks/ http://www.estruyf.be/blog/creating-a-new-color-palette-for-a-sharepoint-2013-composed-look/ http://spitems.wordpress.com/2011/01/17/using-theme-settings-in-style-sheets/ […]
Hi,
I have a problem. Your script for adding a “composed look” work, but the new “composed look” do not appear in Design Gallery.
I’m use the Imperative Method, do you have the same behaviour ? or your composed look appear in list of composed look and in design gallery ?
Thanks
Hi,
I found it! the spfont and spcolor files must be at the root of “/ _catalogs/theme/15 /” should not create additional directory for your custom spfont or spcolor !
In your opinion, is this a Sharepoint bug (another ;))?
PS: Sory for my english
Interesting findings, I’ll try that out in my environment to verify.
Hi, thanks for your article.
In the “Adding a Composed Look – the Imperative Method” the path for the FontSchemeUrl is wrong, it would be …MyFontScheme.[b]spfont[/b] instead of …MyFontScheme.spcolor
Thanks! I’ll update the article.
After the deployement it showed the below error.please help me to resolve this issue
Error occurred in deployment step ‘Activate Features’: List ‘Cs Look’ does not exist at site with URL ‘http://uichdbss06’.
Which method are you using to add the look? code or xml.
In your composed looks elements.xml you used absolute paths to the files, it is better to just use server relative paths.
Good guide and goes well with this video: http://www.youtube.com/watch?v=H8Mumn5rk2I
Hi, thanks for the feedback. Yes you are should use relative paths if you plan to deploy to other site collections. Otherwise it may not work properly.