In this post we are going to create a 2 tier navigation menu using SPServices. In this scenario we’ll be replacing the current quick launch and putting in our new navigation. This will work with whatever version of SharePoint.
This solution would most likely work with more tiers but the CSS I have provided in the example only accounts for 2 tiers
Things you’ll need
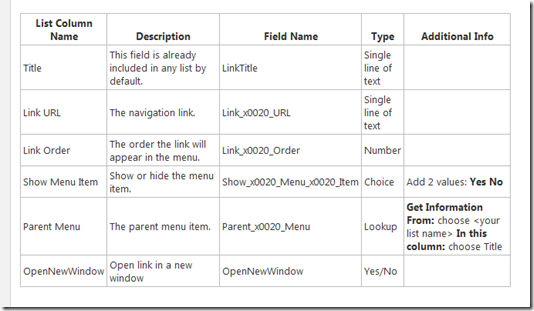
a Data Source (SharePoint List) – I have specifically configured my list EXACTLY as defined in this way.
On to the implementation steps
Prior to starting any front end work make sure you have the Custom List as defined above created. I’ve called my list ‘Navigation’
Create a few nodes so that you’ll have some data and know that its working properly.
After creating the list and some test nodes, make sure that you have resources to the jQuery and SPServices on your site.
I am storing those files on my SiteCollection / js Folder which I created in SharePoint Designer. You can potentially store the files anywhere or get jquery through a Content Delivery Network (CDN) – http://docs.jquery.com/Downloading_jQuery#CDN_Hosted_jQuery
and just recently SPServices is now available through a CDN -http://www.cdnjs.com/#/search/jquery.spservices
I’ve just downloaded the files from the site and I’ll be hosting them in a folder on my Site Collection as I mentioned earlier. Here is a picture of them in their location.
You might have noticed in that picture the navigation.js. We need to create a blank file as this point called navigation.js this is where the navigation jQuery code will go. You can download that file here.
Once you have that file open it up in a text editor. In the first line set the assignment of the variable “NavigationList” equal to the name of the new list you created. If you are querying a list on another site you would need to specify the WebURL, otherwise leave it blank and it will query the site that the web part is currently on.
Once your are done editing save the list alongside the other .js files.
**NOTE: If you see line 6, this is the object that we will be replacing. You can play around and modify that to potentially go wherever. **
Next I start off with a generic SharePoint page, and I’ll add a Content Editor Web Part (CEWP). I start off this way because the Content Editor is the easiest way to demo this example. You could embed this into a portion of the master page or some other method.
Edit the CEWP properties, click on Source Editor
Add the following information, take special notice to the paths to the files. In this demo I’m on the /sites/tew , site collection. Adjust that to meet your correct path.
So above we are linking to a CSS file that we have not yet created (but will). The first JavaScript link is to the jQuery library. The second is to SPServices library. The third to our custom code to create the navigation.
So Save that content in there, hit OK or Save to commit the page.
Now lets add the CSS file. A sample CSS file can be provided here, or you can create your own.
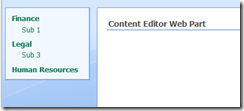
Once you have the correct JS files in place and the CSS in place when you browse or refresh the page you should see the new navigation instead of the quick launch.
Here is a before and after shot.
My files for download again are
The Navigation Script
The Navigation CSS


Can you please provide links for script and CSS? links provided no longer work
thanks for pointing that out. dropbox remove all public links so I have to move all my files. The links in the article are now working.
It would appear that SPServices does not work with jquery-1.9.1
http://sympmarc.com/2013/02/05/spservices-compatibility-issues-with-jquery-1-9-1/
you can go an use the latest version of jQuery and SPServices. I don’t believe that I’m using anything that has been deprecated.
Cannot download the JS and files
Working on it… my company changed their public site and my files were on there.
script posted
Great idea, it does not work right with SP Online! Do you have any idea how can I make this work in SP online?
Thank you
I just tested it in SharePoint online and it’s working perfectly. Is there something specific you are experiencing?
It works beautifully (on SP 2007). Thanks for the well written, easy-to-understand tutorial. SPServices ftw!!!